
Contents
- What a step consists of
- Which events a step can be configured for
- Step visibility and start
- Step trigger conditions
- Step description
- Step data
- Actions
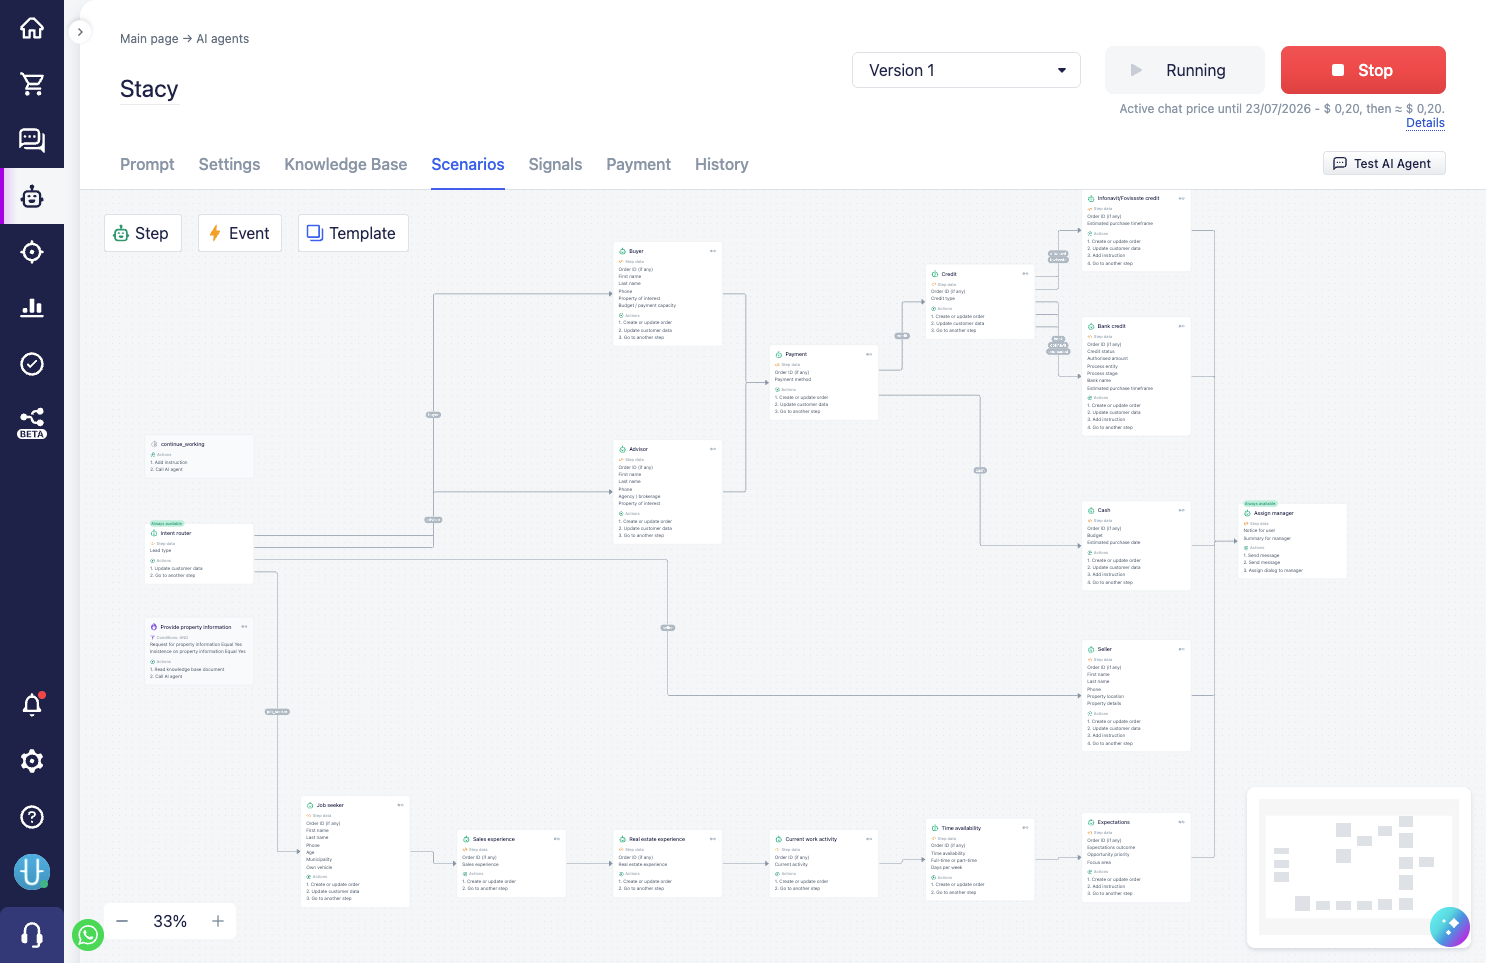
A step is the basic unit of a scenario and, in essence, the main building block of all the agent's useful work. Everything the agent can do is assembled through steps: ask a question and collect data, save it to the client card or order, hand the dialog over to a manager, move to the next stage of the conversation. A set of linked steps forms the scenario — the predefined logic of the agent's behaviour.
The idea is not to describe the entire working logic with general instructions that the agent might forget or ignore, but to break it down into individual steps. The agent calls a step at the right moment, runs it, and receives the next batch of tasks. This makes the behaviour predictable, and complex work can be assembled from simple, repeatable pieces.
What a step consists of
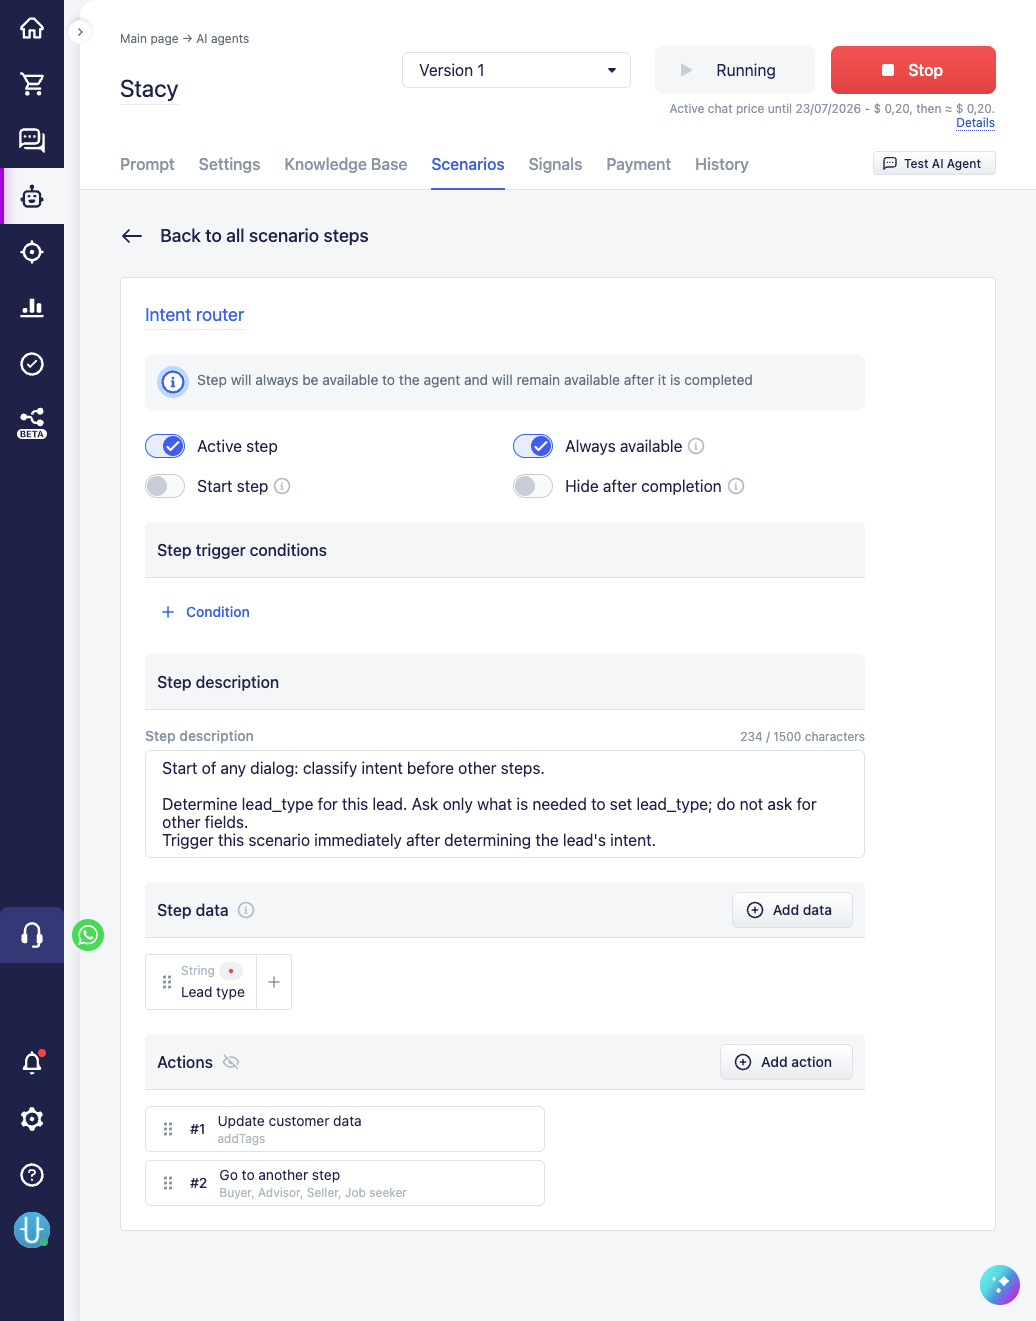
Every step has the same component parts:
- Name — name the step briefly and meaningfully, by the role it plays in the scenario. A clear name helps not only you to navigate the scenario diagram, but also the agent — to understand the step's purpose.
- Visibility toggles — when the step is available to the agent during work with the scenario.
- Step trigger conditions — universal rules that limit the step's availability.
- Step description — the instruction for the agent: what kind of step this is, when and how to call it, what role it plays.
- Step data — what data the agent should collect from the conversation context in this step.
- Actions — what actions the system should perform when the step is called. The agent itself does not see these actions.
A step comes in two kinds depending on who starts it: a step that the agent itself works with (the agent chooses it during the conversation) and a step triggered by an event (the system triggers it — on a message, a signal, by a timer). This separation is described in detail in the When the agent starts section.
Which events a step can be configured for
When you create an event step, you choose which event the system will start it on. The following events are available:
- Message from customer — the client wrote in the chat. As soon as such a step is created, the system calls it on every incoming message from the client, so you almost always need to use "Step trigger conditions" to define when exactly it should fire: for example, checking for a particular word in the message text or limiting the step to messages from certain clients only. By default, a message from the client wakes the agent itself (if the dialog is on the bot), and a step on this event lets you override that behaviour (how this order works is covered in the How to cancel the agent's automatic start section).
- Dialog assignment — the dialog was reassigned to a new owner. The event fires on any assignment — to the agent, to another bot, or to a manager. By default, the system will start the agent only if the dialog ends up assigned to the agent itself (the dialog on the bot) — this is the typical "initial" start, when the agent greets the client and enters the scenario; if the dialog went to another owner, the agent does not engage. A step on this event is useful precisely because it catches all assignments in the chat one after another — you can build a more complex dialog distribution scheme on it.
- Dialog closing — the dialog has ended. By default, the agent clears the conversation context at this point. A step on this event is needed to finish something off at the end: discard remaining reminders, assign tags, record the outcome. An important subtlety: if the dialog was closed by the agent itself through a scenario action, such steps are not triggered — this is loop protection (see Loop protection).
- Delayed action — running a step by a timer after a set time. This is not a chat event but an internal mechanism: it brings the agent back to work after the necessary time interval. Its main use is reminders and continuing the conversation when the client goes quiet (for details, see the Delayed actions section).
- Message from manager — an employee wrote in the chat. The agent usually does not reply to this, but the message is saved in the history so that it takes it into account as part of the conversation. A step on this event lets you track certain messages from the manager and run background agent actions in response.
- Command from manager — the service command
/agentin the chat. This is the only way for the manager to manually start the agent or return work to it. A step on this event acts as the target step that the manager launches with the/agent StepNamecommand (for details, see the Manager command to start the agent section). - Message sent to customer — the agent can send messages on its own; nothing needs to be configured in the scenario for that. But if additional actions need to run on every such send, this event is what serves that purpose: your step's fields and actions are mixed into the send itself. While the agent formulates the reply, it also fills in the step's fields — providing additional data right at the moment of sending (for example, what type of message it is sending) — and the step's actions run right after the send, without a separate agent start, and therefore at no additional cost. This is used, for example, to build a flexible reminder system in the chat (for details, see the Delayed actions section).
- Reaction to signal — fires when the signal values match the defined conditions. These conditions themselves are set through "Step trigger conditions" — the same condition mechanism as for ordinary steps. If, besides the signal values, the conditions also specify other checks, those must be satisfied at the moment the signal fires too — otherwise the step will not start. It is used for automatic reactions to the state of the conversation and for intercepting behaviour: for example, on a "client irritated" signal, mixing in an instruction for the agent to offer a manager (for details, see the Signals section).
Step visibility and start
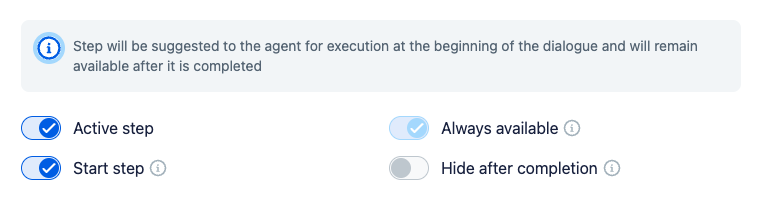
Several toggles determine when a step is available to the agent:
- Active step — a disabled step is completely excluded from work: the agent does not see it, and it is not triggered by events.
- Always available — the agent sees the step throughout the whole dialog and can call it at any time. This does not force the step to be called, it merely keeps it available all the time.
- Start step — at the start of the dialog, the system immediately gives the agent the task of beginning with this step. This is how the entry point into the scenario is defined.
- Hide after completion — after the step has run, it disappears from the available steps and cannot be called again until a transition from another step opens it (or until a new dialog begins).
At the top of the page there is an informational hint that describes the current combination of toggles in words (for example, "The step will always be available to the agent and will remain available after it is completed") — it is handy for confirming that you configured what you intended.
The main purpose of these checkboxes is to control how many movement options through the scenario are open to the agent at each moment. Some steps are kept available at all times so that the agent can return to them whenever needed; others are opened only when they are actually needed. The combination of the visibility checkboxes and the "Go to another step" action is what defines in which directions the agent can move on: which steps are available immediately, which open only by transition, and which disappear after running.
For this reason, after configuring a step, carefully check its availability: whether it will remain available to the agent after it has already worked with it — and whether that is what you want. And if it remains available — whether the agent can tell from the description what to do with this step when it encounters it again.
Repeated calls and data correction
A common configuration mistake is related to the "Hide after completion" toggle. The agent often needs to call a step again within a single dialog: the client made a mistake with the phone, changed their mind about the request type, wanted to add the budget later. If such a step is hidden after the first pass, the agent will no longer be able to correct the data neatly through the scenario and will start improvising with free text.
So before enabling hiding a step after completion, it is worth asking yourself: might the agent legitimately need to call this step again in the same dialog — to fix data, change a choice, add an optional value? If so, leave the step available. It makes sense to hide what really runs only once (for example, a one-off greeting or the final handover to a manager).
Typical toggle combinations
A few stable combinations are the most common — it is handy to keep them as ready-made recipes:
| What kind of step | Always available | Hide after completion | Why |
|---|---|---|---|
| Central repeatable step: intent classification, the agent's main work | yes | no | Must remain available the whole dialog. If hidden, the agent may lose the main task and won't be able to fix the data |
| Single "hand over to a person" point | yes | no | The client may ask for a manager at any time and more than once |
| One-off handover to a manager after a branch | depends | yes | Fires once and is hidden; if opened only by transition, "Always available" can be turned off |
| One-off start action: for example, send the data processing policy | yes | yes | Runs once and disappears; inside, you can immediately link the next step with a transition |
| Internal branch step | no | yes | Hidden from the agent, opened by transition, and hidden again after running |
| Data correction step | no | no | Stays available for repeated calls and edits |
| Internal step followed immediately by a manager | no | yes | We do not expect edits in this dialog; a person works further |
The start step (the entry point into the scenario) usually matches the first row of the table: a central step, always available and not hidden, additionally marked as the start step.
Step trigger conditions
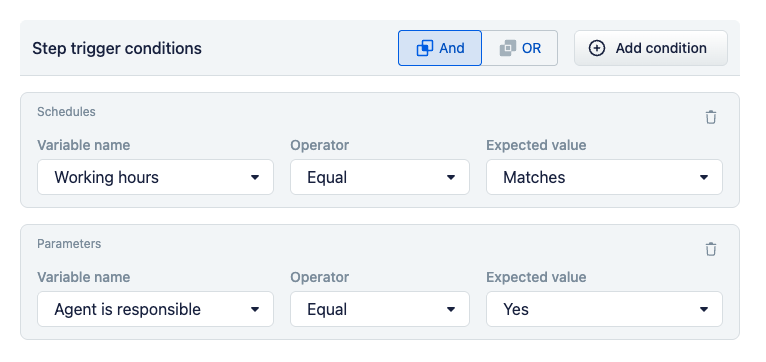
Conditions are the system-level availability filter for a step: a set of checks performed by the system itself. They work universally, for steps of any type — both those the agent chooses and those triggered by events. For example, open the step only during working hours, only for clients with a certain tag, or only after the required signal. If a condition is not met, the step simply does not make it into the available ones: the agent will not see it, and an event step will not fire.
For details on conditions, see the Step conditions section.
Step description
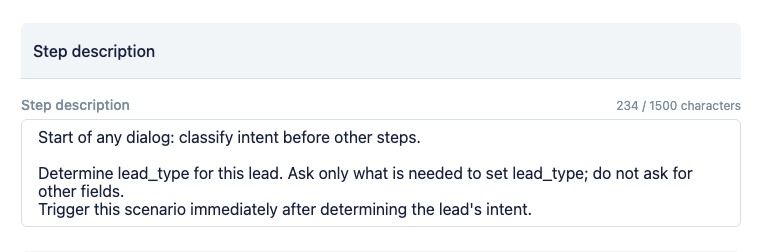
The description answers three questions for the agent: when and why to activate this step, what it does in general, and what needs to be asked of the client in it. This is the instruction the agent reads while choosing which step is suitable for the current situation. Unlike conditions, which mechanically decide whether the step is available at all, the description works among the already-available steps — the agent uses it to choose which of them to call now.
It is important that the description works at the scenario level and should not go into how exactly the actions inside the step are arranged. The agent works with the step as a whole: it decides "call it or not" by the description, and what happens after the call is the system's concern.
If the step is important (for example, the main entry point into the scenario), it is useful to state this directly in the description and, for reliability, to mention it in the main prompt as well.
The step description is a "cold" instruction: it is visible to the agent the whole time the step is available and helps it decide whether to call the step. It is the opposite of "hot" instructions, which are mixed in for the agent after the step runs, via the "Add instruction" action — a task that stays with the agent until it is carried out. The difference between the permanent description and a task issued along the way is covered in detail in the Comparison of scenario instructions section.
Step data
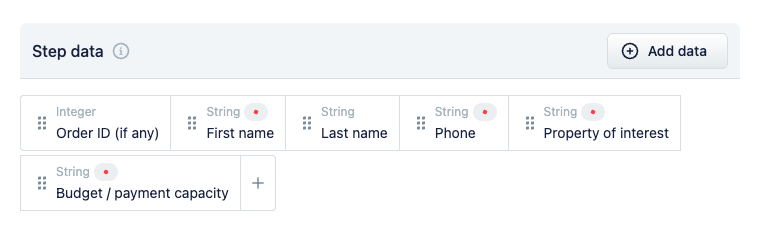
Step data is what the agent collects within the step: name, phone, budget, type of enquiry, and so on. It does not necessarily collect it from the client directly — the agent extracts the data from the conversation, from any unstructured context that comes into the chat. This is one of the agent's main tasks: to extract data from free-form conversation and convert it into a structured form, making further work with it easier. Each data field has several settings, but the most important is the "Instruction for AI agent", because it is from this that the agent understands what to put in the field. The same rule applies here as for a classifier in any scenario: the agent fills in the field by reading your instruction, and without a clear instruction it will make mistakes.
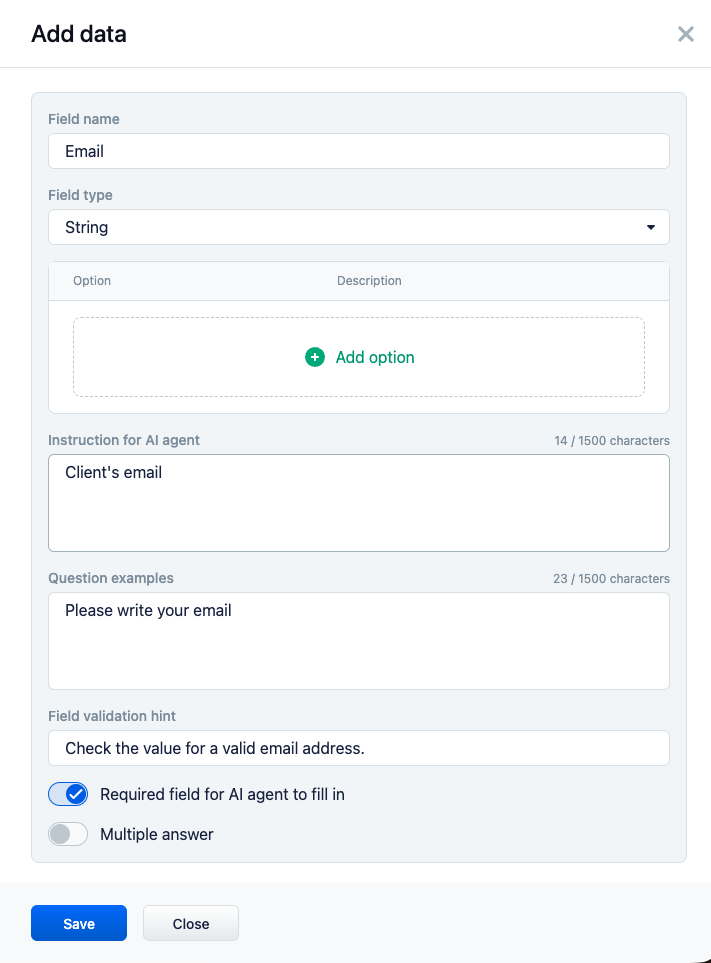
A data field is added in the "Add data" form and is defined by the following settings (in the order of the form):
- "Field name" — a short field name, clear and obvious for the agent;
- "Field type" — string, number, phone, and others, including special types related to CRM data (payment type, delivery type, etc.);
- options (the "Add option" button) — if the field accepts one of several predefined values; each option has its own "Description" column;
- "Instruction for AI agent" — the field's main text: what kind of data this is and how to recognise it (this is the instruction by which the agent decides what to put in the field);
- "Question examples" — the wordings the agent uses to request the data from the client. In essence, this is a high-priority instruction for the agent, but the agent sees it only at one moment: when the field is marked as required and it is not yet among the data the agent brought when calling the step;
- "Field validation hint" — the rules for how to process and check the entered value (the data format);
- "Required field for AI agent to fill in" — a toggle: without the required data, the step will not run its work to completion;
- "Multiple answer" — a toggle: in case several values can go into the field at once, rather than one.
If a field has options, each of them has its own "Description" column — it explains to the agent when to choose precisely that option. Options are usually used for branching: depending on the chosen value, the step leads down different scenario branches (via the "Go to another step" action).
A useful detail: the order of the fields is preserved, and it can be used as a tool. Complex data is better arranged top to bottom — from general to specific — so that the agent first classifies the situation and then refines the details (SGR).
A language rule: write the "Example questions" in the client's language, and the instruction for the agent and the format hint — in whichever language is more convenient for you to configure the system, because it is an instruction for the agent, not text for the client.
Data types
Every data field has a type — it defines what value the agent puts in the field and how the system then processes it. The types fall into four groups.
Simple — a single plain value:
- string — arbitrary text (name, comment, SKU);
- integer — quantities, units;
- decimal — amounts, weight, budget;
- yes/no — a simple flag;
- date — a calendar day;
- date and time — a moment with time precision.
Composite — inside, there is not one value but several related ones at once, and the system processes them in a special way. This simplifies configuration: there is no need to collect each part with a separate field.
- phone — lets you obtain several phone numbers from the client at once and save them to the client card or order;
- address — broken down into parts (postal code, region, city, street, and so on);
- order contents — a list of catalog items with their quantity; it is filled in by the catalog subagent (see Catalog subagent).
Reference — the value is taken from the corresponding CRM reference book, so only what is actually set up in the system will go into the field: manager, order type, creation method, order status, delivery type, payment type.
Custom reference books — the CRM's own custom reference books. They are connected as a set of allowed values for the client's and order's custom fields: the agent chooses a value from your reference book, and it is then placed into the corresponding custom field.
Where the collected data is saved is determined by the actions in the "Client and order" group: Update customer data, Create or update order, and Create or update cart. The reference and custom types are especially useful there: they guarantee that a CRM-compatible value goes into the client or order field.
Data is collected in portions
A point important to understand: marking a field as required does not mean the agent must fill it in immediately on the first call of the step. This is done on purpose.
It works like this:
- The agent sees the step and understands from the description what needs to be done.
- It calls the step with the data it already knows from the conversation — possibly with no data at all.
- If required data is missing, the actions inside the step do not run, and the agent gets back information about exactly what is missing.
- The agent asks the client for what is missing and calls the step again — now with a new portion of data.
- The cycle repeats until all the required data is collected. Then the step's actions run.
In other words, calling the same step multiple times is normal: the agent brings the data gradually, as the conversation with the client progresses. It provides optional data only if the client communicated it.
From this comes a practical rule: clearly divide the data into required and optional. You should not make everything required — that drags out the conversation and irritates the client.
Actions
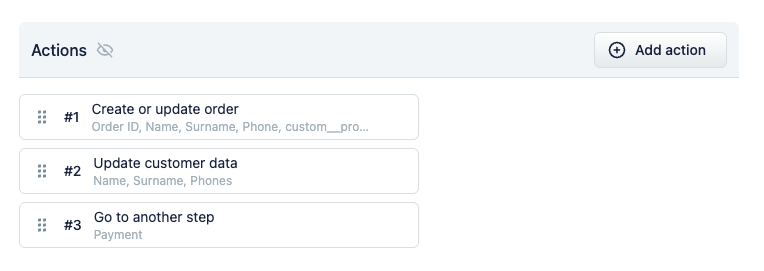
Actions are what the system performs when a step runs: for example, save the collected data to the client card or order, hand the dialog over to a manager, go to another step.
For the agent, a step is a kind of black box: it does not see which actions lie inside. It understands what the step does only from its description and set of fields, while the system performs the actions themselves. At the same time, any useful function of the agent is, in essence, made up of a ready set of actions packaged into the format of scenario steps.
From this comes the key idea of the whole mechanism: the agent moves the scenario along by calling steps, and the system performs the actions configured in them according to the predefined scenario, changing the internal state. A full breakdown of all the actions and their configuration is in the Actions section.
How a complete scenario is assembled from steps and how the agent moves through it is in the Scenario section.