
Contents
- Action order and flow control
- Blocking step execution
- Stopping the agent and step execution
- Communication and AI
- Scenario flow
- Conditional actions
- Dialog
- Client and order
An action is an operation the system performs when a scenario step runs: save the collected data to the client card or order, send a service message, go to another step, hand the dialog over to a manager, assign a tag. The step itself is almost an empty container: it can collect data through fields, but all the useful work is defined by the ordered list of actions inside it.
It is important here to understand the role separation the whole mechanism rests on: the agent moves the scenario along by calling steps, while the actions inside a step are performed by the system. For the agent, a step is a "black box": it decides "call it or not" by the step's description and its fields, but it does not see which actions lie inside or what they will do. So any of the agent's real capabilities (not "promise to hand over to a manager", but actually hand over) appear only through actions packaged into steps.
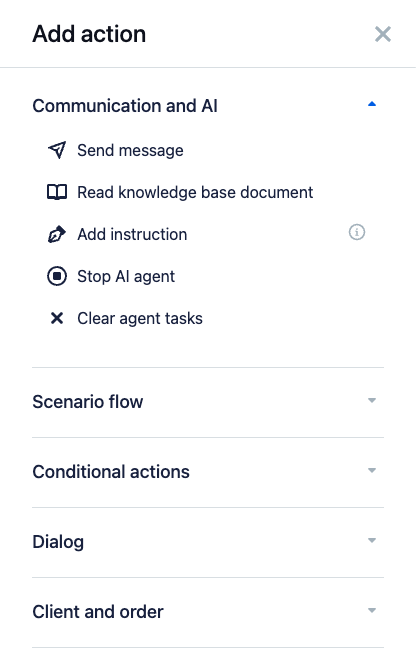
Actions are added to a step through the "Add action" panel — it opens via the "Add action" button when editing a scenario step. In the panel, the actions are grouped by purpose: "Communication and AI", "Scenario flow", "Conditional actions", "Dialog", "Client and order".
Action order and flow control
The actions in a step run in turn, top to bottom, and this flow can be controlled — that is what conditional actions are for. They check a set of conditions and, depending on the result, change the course of execution:
- "Run next actions" — if the conditions are met, run the specified number of the following actions (otherwise skip them);
- "Skip next actions" — the opposite: if the conditions are met, skip the specified number of the following actions;
- "Stop step execution" — finish the step early, without stopping the agent itself;
- "Block step execution" — stop the step and set the agent a task in the dashboard: for example, to come back and collect what is missing.
So the same action placed before or after a conditional one may or may not run — and the order determines what ends up running.
Blocking step execution
Some actions use step data to work — the values the agent brings from the conversation context when it calls the step (phone, type of enquiry, the chosen option). Fields in the step settings can be marked as required: without them, the step's actions have nothing to work with.
The agent can call a step without the required data too — this is normal behaviour. Then the system does not run the step to completion but blocks its execution and sets the agent a task of the "Step data collection" type — to bring the fields marked as required in the settings. The agent extracts them from the conversation or asks the client and calls the step again, and so on until all the required fields are in place; then the step runs. In essence, this is not turning off the work with the step, but collecting the missing data needed to run it — Data is collected in portions.
Step execution can also be blocked without tying it to specific data — just by a set of conditions. The "Block step execution" action is for this: when the conditions are met, the step stops, and the agent receives the block message specified in the action — what is wrong and what needs to be done (for example, the submitted value did not pass validation). The agent fixes the situation and calls the step again.
Stopping the agent and step execution
Two actions serve to pause work, but in different ways: "Stop AI agent" stops the agent's work entirely, while "Stop step execution" finishes only the current step.
"Stop AI agent" completely stops the agent together with the step execution: in the current run, all of its actions cease — not just messages, but everything. It is specifically the current run that stops: on the client's next message, the agent will start again if the dialog is still on the bot by then.
"Stop step execution" (conditional) finishes the current step early, when the conditions defined in the action are met. This is not a block but a normal finishing of the step: it is marked as successfully completed, and the agent receives the next direction in the scenario. The agent itself does not stop — if it has something else to do, it will continue working.
"Close dialog" and "Assign dialog to manager" are logically finishing actions within the dialog with the client, but on their own they do not stop the agent. Since the agent does not know which actions will be performed when the step is called, it may want to continue its work and, if the "Stop AI agent" action is not added, it will be able to continue and, for example, send the client another message:
- after dialog assignment, the agent will no longer start on the client's next message (the dialog will be on the manager), but in the current run it usually does not need to continue working either;
- after dialog closing, a message from the agent sent to the client's chat may reopen it.
So when the agent must definitely stop working after assigning or closing the dialog, add the "Stop AI agent" action at the end.
Communication and AI
"Send message"
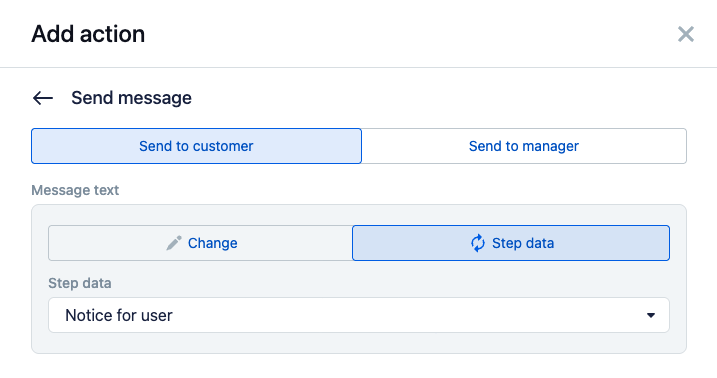
Manual sending of a ready-made message — bypassing the agent's direct actions. The agent still sees this message in the conversation as if it had sent it itself. The recipient is chosen with a toggle: "Send to customer" (the client sees it in the chat) or "Send to manager" (a private message the client does not see — for example, a note for the manager). The text is set in one of two ways: "Change" — fixed text, or "Step data" — taken from a variable the agent filled in.
The key point: the agent can communicate with the client itself, this is its basic capability. The "Send message" action is meant for cases where more control is needed over what the agent writes and when, as well as for fixed notifications ("It is currently outside working hours", "Please wait for a manager"), a private summary for the manager, and sending from background scenario steps where the agent is not called at all.
"Read knowledge base document"
Points the agent to specific documents from the knowledge base, chosen in the "Knowledge base documents" field. Unlike ordinary work, where the agent has to navigate the information loaded into the base on its own, here you specifically tell it which document needs to be studied to continue with the scenario — for example, a regulation the agent must take into account at this stage. About the knowledge base itself, see the Knowledge base section.
"Add instruction"
This is one of the most important actions: it gives the agent a specific, high-priority task in its dashboard — what needs to be done after the step runs. This is a "hot" directive — unlike the "cold" step description, which the agent sees the whole time the step is available and uses to decide whether to call the step. The instruction stays among the agent's tasks until it actually carries it out: completion is counted by what was done, not by what was promised, and directives already carried out remain visible to the agent as completed, so it does not repeat them. Where to place which instructions and how the "hot" ones differ from the "cold" ones is covered in detail in the Comparison of scenario instructions section.
"Call AI agent" (available only in event-triggered steps)
This action is available only in steps the system starts on events. Such steps do not start the agent on their own — they merely perform their set of actions. This action is what makes the agent engage in such steps. The behaviour depends on who the dialog is on at the moment and on the chosen start mode — "Assigned owner", "Background work", or "Dialog takeover". If the dialog is on the bot, the agent will start in any mode; if it is on a manager or another bot, the "Assigned owner" mode does nothing, "Background work" starts the agent: it will not take the dialog over (the owner does not change), but for that one run it can write to the client and perform actions, and "Dialog takeover" assigns it to the bot and starts the agent. For details on the modes and starting on someone else's dialog, see the Starting the agent when the dialog is not on the bot section.
"Stop AI agent"
Completely stops the agent's work in the current run: all of its actions cease, not just messages. It is needed to guarantee that the agent does nothing more — above all after assigning or closing the dialog.
"Clear agent tasks"
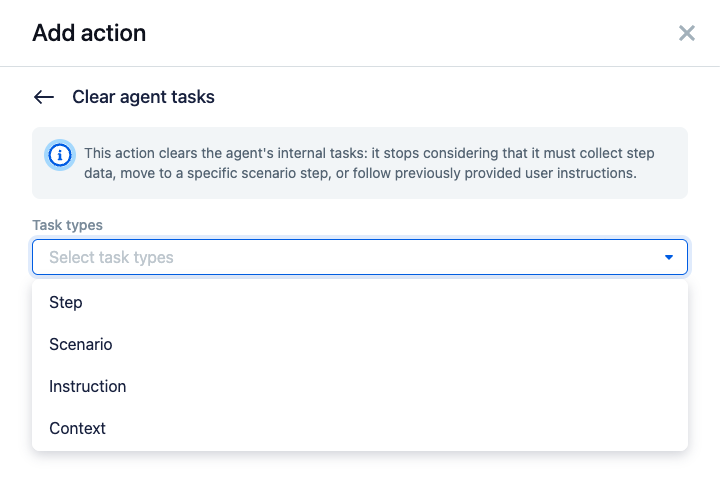
Clears the tasks set for the agent and the context accumulated during work, so that it can switch between scenario branches and not drag outdated goals along with it.
In the "Task types" field you choose which tasks exactly to clear:
- "Steps context" — written by the "Update scenario context" action;
- "Custom instructions" — added by the "Add instruction" action and not yet carried out — they are taken off the agent;
- "Step data collection" — the tasks added after calling steps without the full set of required data;
- "Transition to another scenario step" — the last transition direction given to the agent.
If you do not specify particular task types, all types will be cleared.
Usually this action is used when:
- you need to switch the agent to other tasks within a single scenario after reacting to certain events — for example, when after a signal fires and the corresponding step starts, it is important to give the agent a new direction for work and stop collecting data for the old steps the agent was on before the signal;
- you need to go back in the scenario to correct values received from the client and go through some scenario branch again.
This action can also be used on dialog closing in steps configured for that event, if the automatic context clearing is disabled in the settings. In this case you can control more flexibly which accumulated agent work context needs to be cleared — for more details, see the What accumulates in the context and when it is reset section.
Scenario flow
"Delayed step launch"
"Delayed step launch" schedules the start of a scenario step by a timer. The step you specify in the action settings is the target step, configured for the "Delayed action" event: it is the one that will start when the timer fires, and it can:
- either perform some background actions without the agent's involvement (write a fixed message to the client, distribute or close the dialog),
- or give the agent an additional working instruction via "Add instruction" and start it with the "Call AI agent" action (without a specific direction in the scenario) or "Go to another step", in which an agent target step is chosen (with the work direction specified).
The start time is set in one of these ways: by an interval from the current moment, at an exact moment, or by the system's working hours — at its dynamically calculated start or end. For example, start the step at the beginning of the next working day, after the break ends, or, conversely, at its end.
Like "Go to another step", the delayed launch has a conditional check: at the moment of scheduling, the system looks at whether the target step is available by its conditions, and if it is not available now, the launch is not scheduled. All "Delayed step launch" actions whose target step passed the check will be put on the timer. From a single step you can schedule several launches at once this way, each with its own conditions.
This is the basis of the entire system of reminders and of continuing the agent's work when the client goes quiet. The mechanism is extensive — choosing the time, tying it to a schedule, deduplication — and is covered in full in the Delayed actions section.
"Cancel delayed launch"
Removes previously scheduled delayed launches so that an outdated timer does not fire. A typical case: the client replied before the time of the silence reminder came — the "alarm" is no longer needed and is removed before it wakes the agent in vain.
You can cancel delayed launches when the agent successfully passes a complex section of the scenario — for example, one that requires sending reminders to the client (determining the client's intent at the start of the scenario, collecting the data needed for a step) — in the target step after the agent calls it. But sometimes it is more convenient to add a step that the system starts on every "Message from customer" or "Dialog closing" and do the clearing in it without specifying particular steps. In that case all delayed launches will be cleared.
"Update state variable"
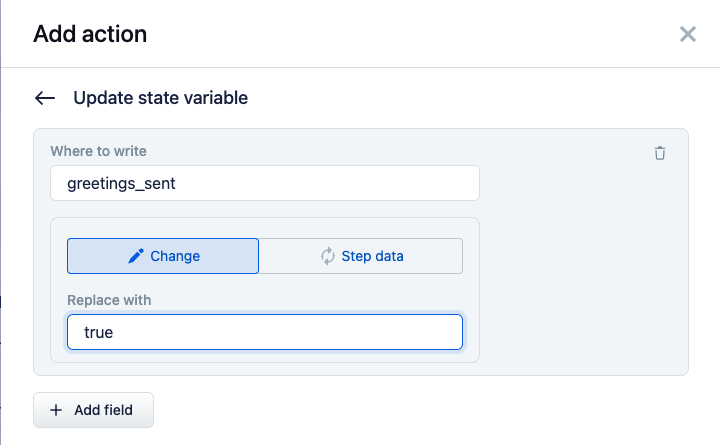
Writes a value into the scenario memory — the chat's internal state, a store invisible to the agent, tied to the conversation with a specific client.
In the "Where to write" field you set the variable name — an arbitrary name that will then be available in the list to choose from when composing conditions. The value can be fixed (the "Change" tab) or dynamic, taken from "Step data". You can write several variables at once via "+ Add field".
The saved value is not shown to the agent as an instruction — it is used in conditions (the "State" source) to branch the scenario. The variable names used earlier in this action will be available to choose from in the condition-composing form.
The saved values are not cleared together with the scenario context when the dialog is closed. About the "State" source and its lifecycle, see the Data sources for conditions section.
"Update scenario context"
The form is almost the same — a key name in "Where to write" with an arbitrary name. The value can also be fixed or dynamic (determined by the agent). But the meaning is the opposite: this value is not only visible to the agent, it is also added to the work dashboard and becomes a powerful tool for directing the agent, as a background directive that influences its reasoning and actions in the following steps.
Do not overdo it: a large volume of information in the context can worsen the agent's work. An empty value removes the key. The accumulated scenario context is cleared via "Clear agent tasks" → "Steps context".
"Add instruction" and "Update scenario context" are types of instructions for the agent (their theory is in the Scenario instructions section); "Update state variable" is service memory for the system, not for the agent.
"Go to another step"
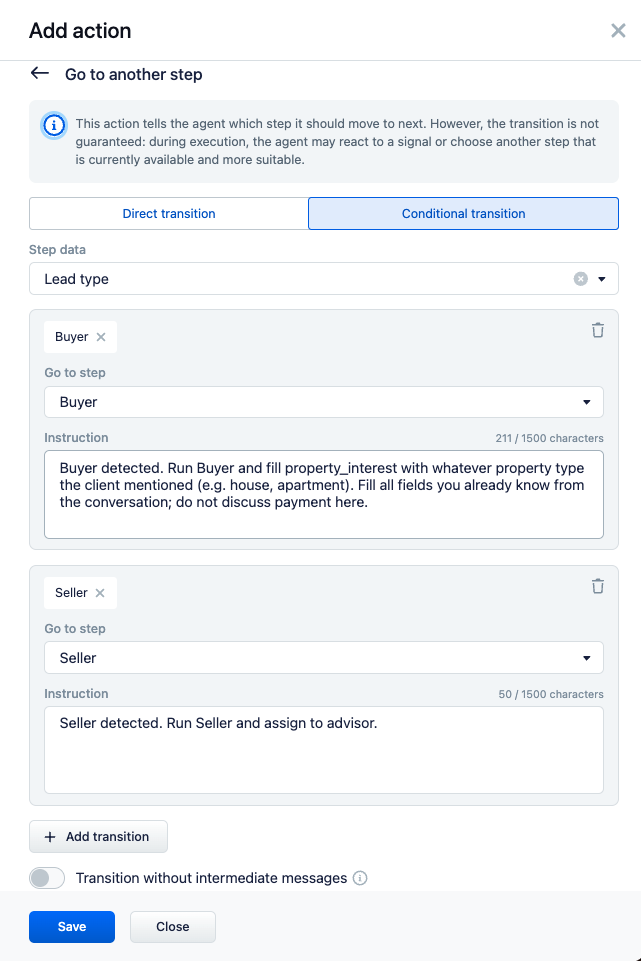
The most important action, which links individual steps into a work scenario. It sets the agent a direction: which next step to move to after successfully running the current one. It is important to understand: "the transition is not guaranteed" — the agent may react to a signal or choose another available scenario step more suitable for the context. This is a direct consequence of the "the agent itself moves the scenario along" principle (see How steps are assembled into a scenario).
Two modes of operation:
- "Direct transition" — always the same target step for the transition;
- "Conditional transition" — you choose a variable in "Step data" with predefined value options that allow moving to different target steps (the classic branching by the collected value). Several values can lead to the same step. Variables with a multiple value are not suitable for the choice.
To save time, you can "Create new step" in the scenario right from the list of steps, and the transition will be configured to it.
In the "Instruction" field you can attach a short explanation to the agent of "how and why" to make the transition, which becomes one of the powerful types of instructions shown to the agent in the dashboard until the transition is made.
The "Transition without intermediate messages" toggle makes the transition "silent" — the agent temporarily loses the ability to write to the client on its own and is forced to silently follow the specified direction to the target step. Using this mode together with the "Send message" action with text taken from the step data the agent filled in noticeably increases stability in critical sections of work, where several messages need to be sent to the client in a row. As a result, the agent only prepares the text for the messages based on the conversation context, while they are sent manually in the scenario steps the agent calls "silently".
Another convenient way to configure flexible scenarios is the "conditional transition", when the task to move to another step is not created because the target step is currently unavailable by conditions — for more details, see the Conditional transitions via the "Go to another step" action section. This mechanism is built on the principle that within a single step only one (the first in execution order) transition-to-another-step task can be added. If the target step is unavailable under the current set of conditions, the transition of the next action fires, and so on.
Conditional actions
Conditional actions do not do useful work themselves but control how the other actions inside the step run. All four have the same mechanism for defining a set of conditions (the "+ Condition" button, choosing the value source, the operator, and the expected value), described in detail in the Conditional actions inside a step section. They differ in what they do with the flow:
- "Run next actions" — if the condition is met, the next N actions run as usual; if not, they are skipped. The number is set in the "Number of current step actions to run" field.
- "Skip next actions" — the mirror image: if the condition is met, the next N actions are skipped; if not, execution continues. The number is in "Number of current step actions to skip".
- "Block step execution" — if the condition is met, the step stops with a message to the agent ("Step block instruction"), and the step is not considered completed: the agent must fix the situation and call the step again. In essence, this is a manual check of "the data is wrong — go back and fix it".
- "Stop step execution" — if the condition is met, the current step finishes, the rest of its actions are skipped, but the step is considered completed, and the agent moves on.
"Run" and "Skip" are two sides of the same thing; choose whichever reads more clearly in a given place (usually "Run next actions" is more intuitive). And the two "stops" differ by outcome: "Block step execution" sends the agent back to finish (the step is not completed), "Stop step execution" quietly closes the step as completed.
Dialog
"Add tag to dialog" and "Remove tag from dialog"
Assign and remove tags on the current dialog; the tag value is fixed ("Change") or from a step variable ("Step data"). These are tags for the current dialog; tags for the client are separate actions in the "Client and order" group.
"Assign dialog to manager"
A simple change of owner, without returning the dialog to the agent. Three modes:
- "Manager" — the same manager from the "Change" list, or the most suitable employee for the conversation context, chosen dynamically by the agent from "Step data" (to choose one, you need to set up a variable of the "Manager" type in advance);
- "Bot" — another responsible bot connected to the system;
- "Bot distributor" — automatic distribution according to the distributor bot settings (make sure it is connected).
A dialog assigned to a manager can be handed over to the agent in only one way — by sending the /agent command in the chat. The agent will take the dialog over itself and continue working with the client.
"Handoff dialog to manager"
A handover of the dialog with a return to the agent. It sets in advance the scenario step the agent will return to after a command from the manager.
It packs several actions at once:
- the choice of whom to hand the dialog over to ("Manager" or "Bot distributor");
- "Message to client" — a warning before the distribution (taken from step variables);
- "Summary for manager" — a private summary for the manager (taken from step variables);
- the target step for the return in the "After processing go to step" field.
After the handover, the agent stops on this turn and does not send extra messages.
The manager can return the dialog to the agent to continue working with the chat command /agent <step> [optional instructions] — for more details, see the Manager command to start the agent section.
"Close dialog"
Finishes the current open dialog in the chat.
To guarantee that the agent does not send additional messages to the client after assigning or closing the dialog, add the "Stop AI agent" action at the end.
Two related subtleties: when the dialog is closed by the agent itself with a scenario action, the steps configured for dialog closing are not triggered (loop protection — see Loop protection); and on closing, by default, the accumulated context is cleared (see Clearing the context when the dialog is closed).
Client and order
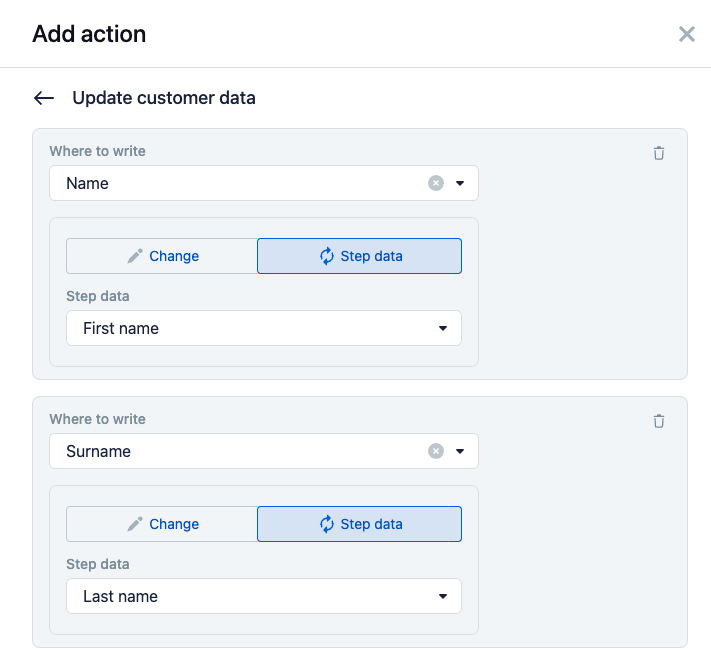
"Update customer data"
Lets you save the data obtained during work to the client card.
For this action to work effectively, you first need to configure and describe in detail the set of step data with suitable value options, so that the agent correctly chooses and fills in the values from the context of communication with the client.
The "Add field" button lets you configure several "field in the client card – data source" links. To configure a link, in "Where to write" you choose a client field (including custom fields); the value source can be a variable filled in by the agent from "Step data" or a fixed value ("Change"). The type of each step variable is chosen to fit the target field — the full list is in the Data types subsection.
Among the types there are composite ones. A variable of the phone type lets the client provide several numbers at once — all of them are saved to the client card. A variable of the address type saves the client's address.
This action always works with the same client the chat is linked to in the system. If the client does not exist at the moment the action is called, they will be created automatically and linked to the chat.
"Add tag to customer" and "Remove tag from customer"
Assign and remove tags in the client card in the system. The add action has a "Pin the first tag" toggle — the first of the added tags is marked as pinned in the client card.
"Create or update cart"
Lets you save a list of product catalog items in the system and track (in the "Current cart" widget) which products the agent set aside as a result of communicating with the client. This action can be used as one of the stages of creating an order in the chat, when the order contents are first discussed and prepared with the client, and then, in a separate scenario step, the assembled cart is used to create the order.
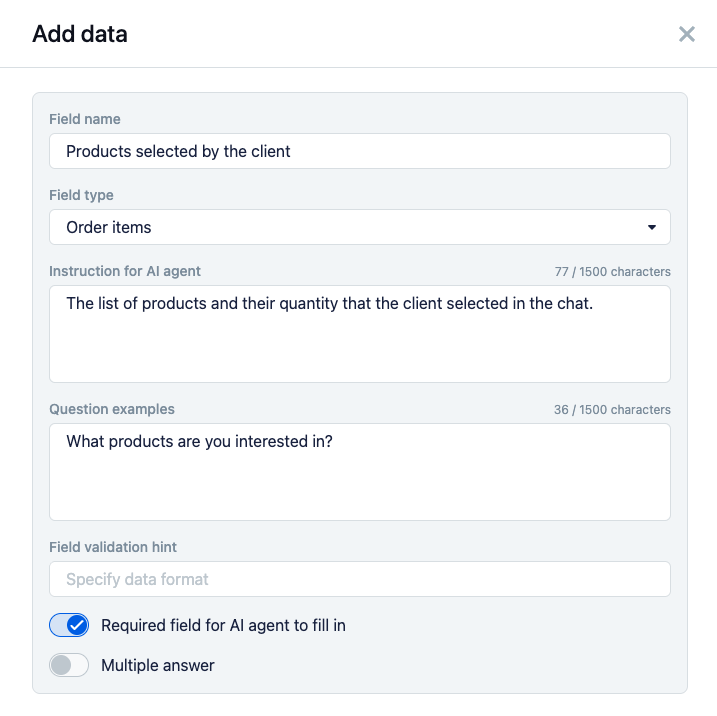
The contents are passed through a step variable of the "Order contents" type — by the same mechanism as when saving the contents to an order: inside it are the catalog items found by the agent with their quantity (about the type, see the Data types subsection).
The cart can only be prepared by the catalog subagent — about this pairing, see Catalog subagent. So, to use this action, you need to enable it on the "Knowledge Base" settings tab and choose a catalog to work with in "Connect catalog (products or services)".
"Clear cart"
Clears the client's cart in the system. If the cart was used when creating the order, it is advisable to clear it while specifying which variable holds the ID of the created order, which the agent must pass into the step data from the work context.
"Create or update order"
In terms of its working logic and configuration, this action is analogous to the "Update customer data" action, only it saves the data to the order. You also need to first prepare a set of variables in the step data, which can then be used in the "field in the order card – data source" link (via the "+ Add field" button).
Composite variable types behave differently in an order than in a client: a variable of the phone type is split into at most two — the main and the additional one; a variable of the address type fills in the delivery address.
Unlike the "Update customer data" action, which is always single within a chat, a client can have any number of orders. So it is important to teach the agent to work with a previously created order and update it when needed. For this, an optional variable of the integer type containing the ID of the created order, if any, is added to the step that has the "Create or update order" action. Then the "Order ID" field's link to the created variable is configured.
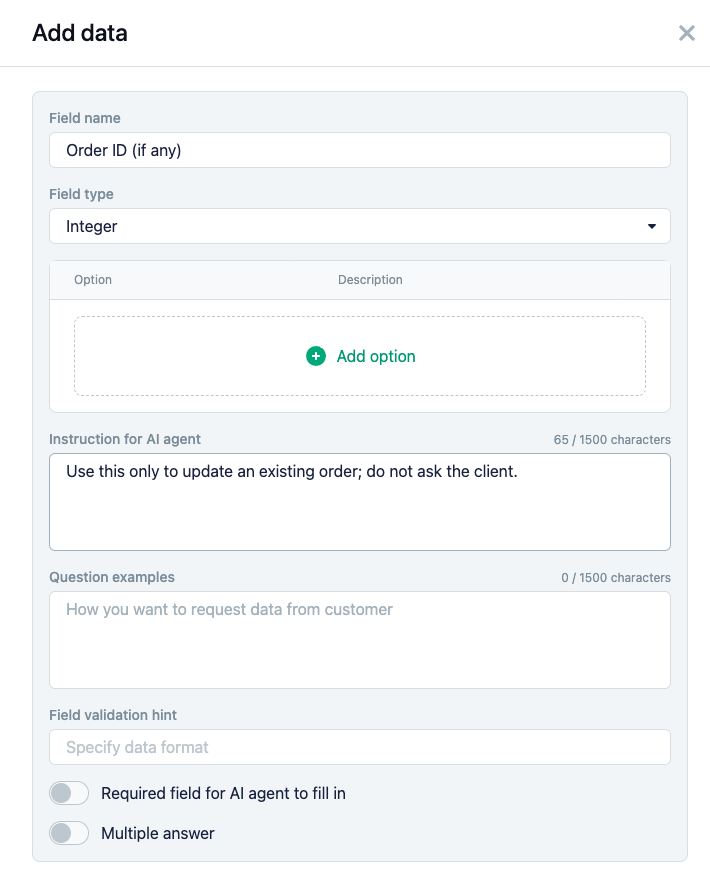
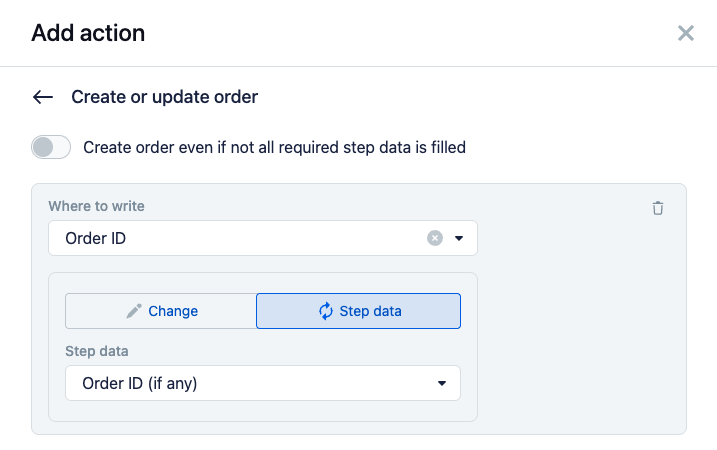
The agent understands by itself, from the conversation context, whether an order was created earlier. If there is none, it does not pass this value when calling the step, and the system creates a new order. The agent receives the new order's ID in response, and it is also saved automatically into its work context. On the next call of the step containing the same configured order-saving action, the agent will pass the order ID and, instead of creating a new one, the existing order will be updated.
Collecting all the data needed to create an order can lead to the step and its variables growing too large. The client may refuse to answer the agent's many questions and leave. There are two strategies to solve this:
-
gradually collect the needed data in a chain of linked steps, passing the created order's ID between them and supplementing it each time with the newly obtained data. For example, in the first step ask the client for contact details, in the second — the address and delivery method, and at the end of the chain save the order contents and change its status;
-
use the "Create the order even if not all required step data is filled in" toggle (disabled by default), which lets you create the order right away, without waiting for the agent to collect all the necessary data from the client.
In both cases, a special scenario step variable type — "Order contents" — serves to save the order contents. A variable of this type contains "inside" the specific items the agent found from the product or service catalog, along with their quantity. All that is left is to specify this variable in the link with the "Order items" field. About "Order contents" and the other step variable types, see the Data types subsection.
A simple rule for where to save data:
- if the data is needed by the business or the manager — write it to the client/order;
- if it is only needed by the scenario for branching and conditions — to the state;
- if it is needed by the agent so that it keeps something in mind — to the scenario context.